> ## Documentation Index
> Fetch the complete documentation index at: https://docs.hunch.dev/llms.txt
> Use this file to discover all available pages before exploring further.
# MySQL
> Connect your MySQL database to Hunch
This guide will help you securely connect your MySQL database to Hunch in just a few minutes.
***
## ✅ What You'll Need
* **MySQL Database** (version 5.7 or higher)
* **Database Host** and **Port** (usually 3306)
* **Database Name**
* **Admin access** to create a read-only user
***
## 1️⃣ Create a Read-Only Database User
For security best practices, we recommend creating a dedicated read-only user for Hunch. Connect to your MySQL database as an admin user and run the following SQL commands:
### Step 1: Create the User
```sql theme={null}
CREATE USER 'hunch_readonly'@'%' IDENTIFIED BY 'your_secure_password_here';
```
### Step 2: Grant Read-Only Permissions
Grant the necessary permissions to access your data:
```sql theme={null}
-- Grant connection permission to the database
GRANT USAGE ON *.* TO 'hunch_readonly'@'%';
-- Grant read permissions on the specific database
GRANT SELECT ON your_database_name.* TO 'hunch_readonly'@'%';
-- Apply the changes
FLUSH PRIVILEGES;
```
For multiple databases, you can grant access to specific databases:
```sql theme={null}
-- Grant read permissions on multiple databases
GRANT SELECT ON database1.* TO 'hunch_readonly'@'%';
GRANT SELECT ON database2.* TO 'hunch_readonly'@'%';
-- Or grant read access to all databases (use with caution)
GRANT SELECT ON *.* TO 'hunch_readonly'@'%';
-- Apply the changes
FLUSH PRIVILEGES;
```
> **Note for Managed MySQL Solutions**: If you're using a managed MySQL service like AWS RDS, Google Cloud SQL, Azure Database for MySQL, or similar platforms,
> you may need to follow additional steps to create a read-only user.\
> These platforms often have specific procedures and limitations for user management.\
> Please refer to your platform's documentation for the correct method to create a read-only user for your specific managed MySQL instance.
### Step 3: Verify the User (Optional)
Test that the read-only user works correctly:
```bash theme={null}
# Connect as the hunch_readonly user and try a simple query
mysql -h your_host -P 3306 -u hunch_readonly -p your_database_name -e "SELECT USER(), DATABASE();"
```
***
## 2️⃣ Configure SSL (Recommended)
For production databases, we strongly recommend enabling SSL. Configure your MySQL server to require SSL connections.
### Client SSL Modes
Hunch supports the following SSL modes:
* **`REQUIRED`** - Always use SSL (recommended for production)
* **`VERIFY_CA`** - Verify the server certificate against CA
* **`VERIFY_IDENTITY`** - Verify the server certificate and hostname
* **`DISABLED`** - No SSL (only for development/testing)
***
## 3️⃣ Connect MySQL to Hunch
1. Log into [Hunch.dev](https://app.hunch.dev/login)
2. Click on your organization name > **Connect Data**
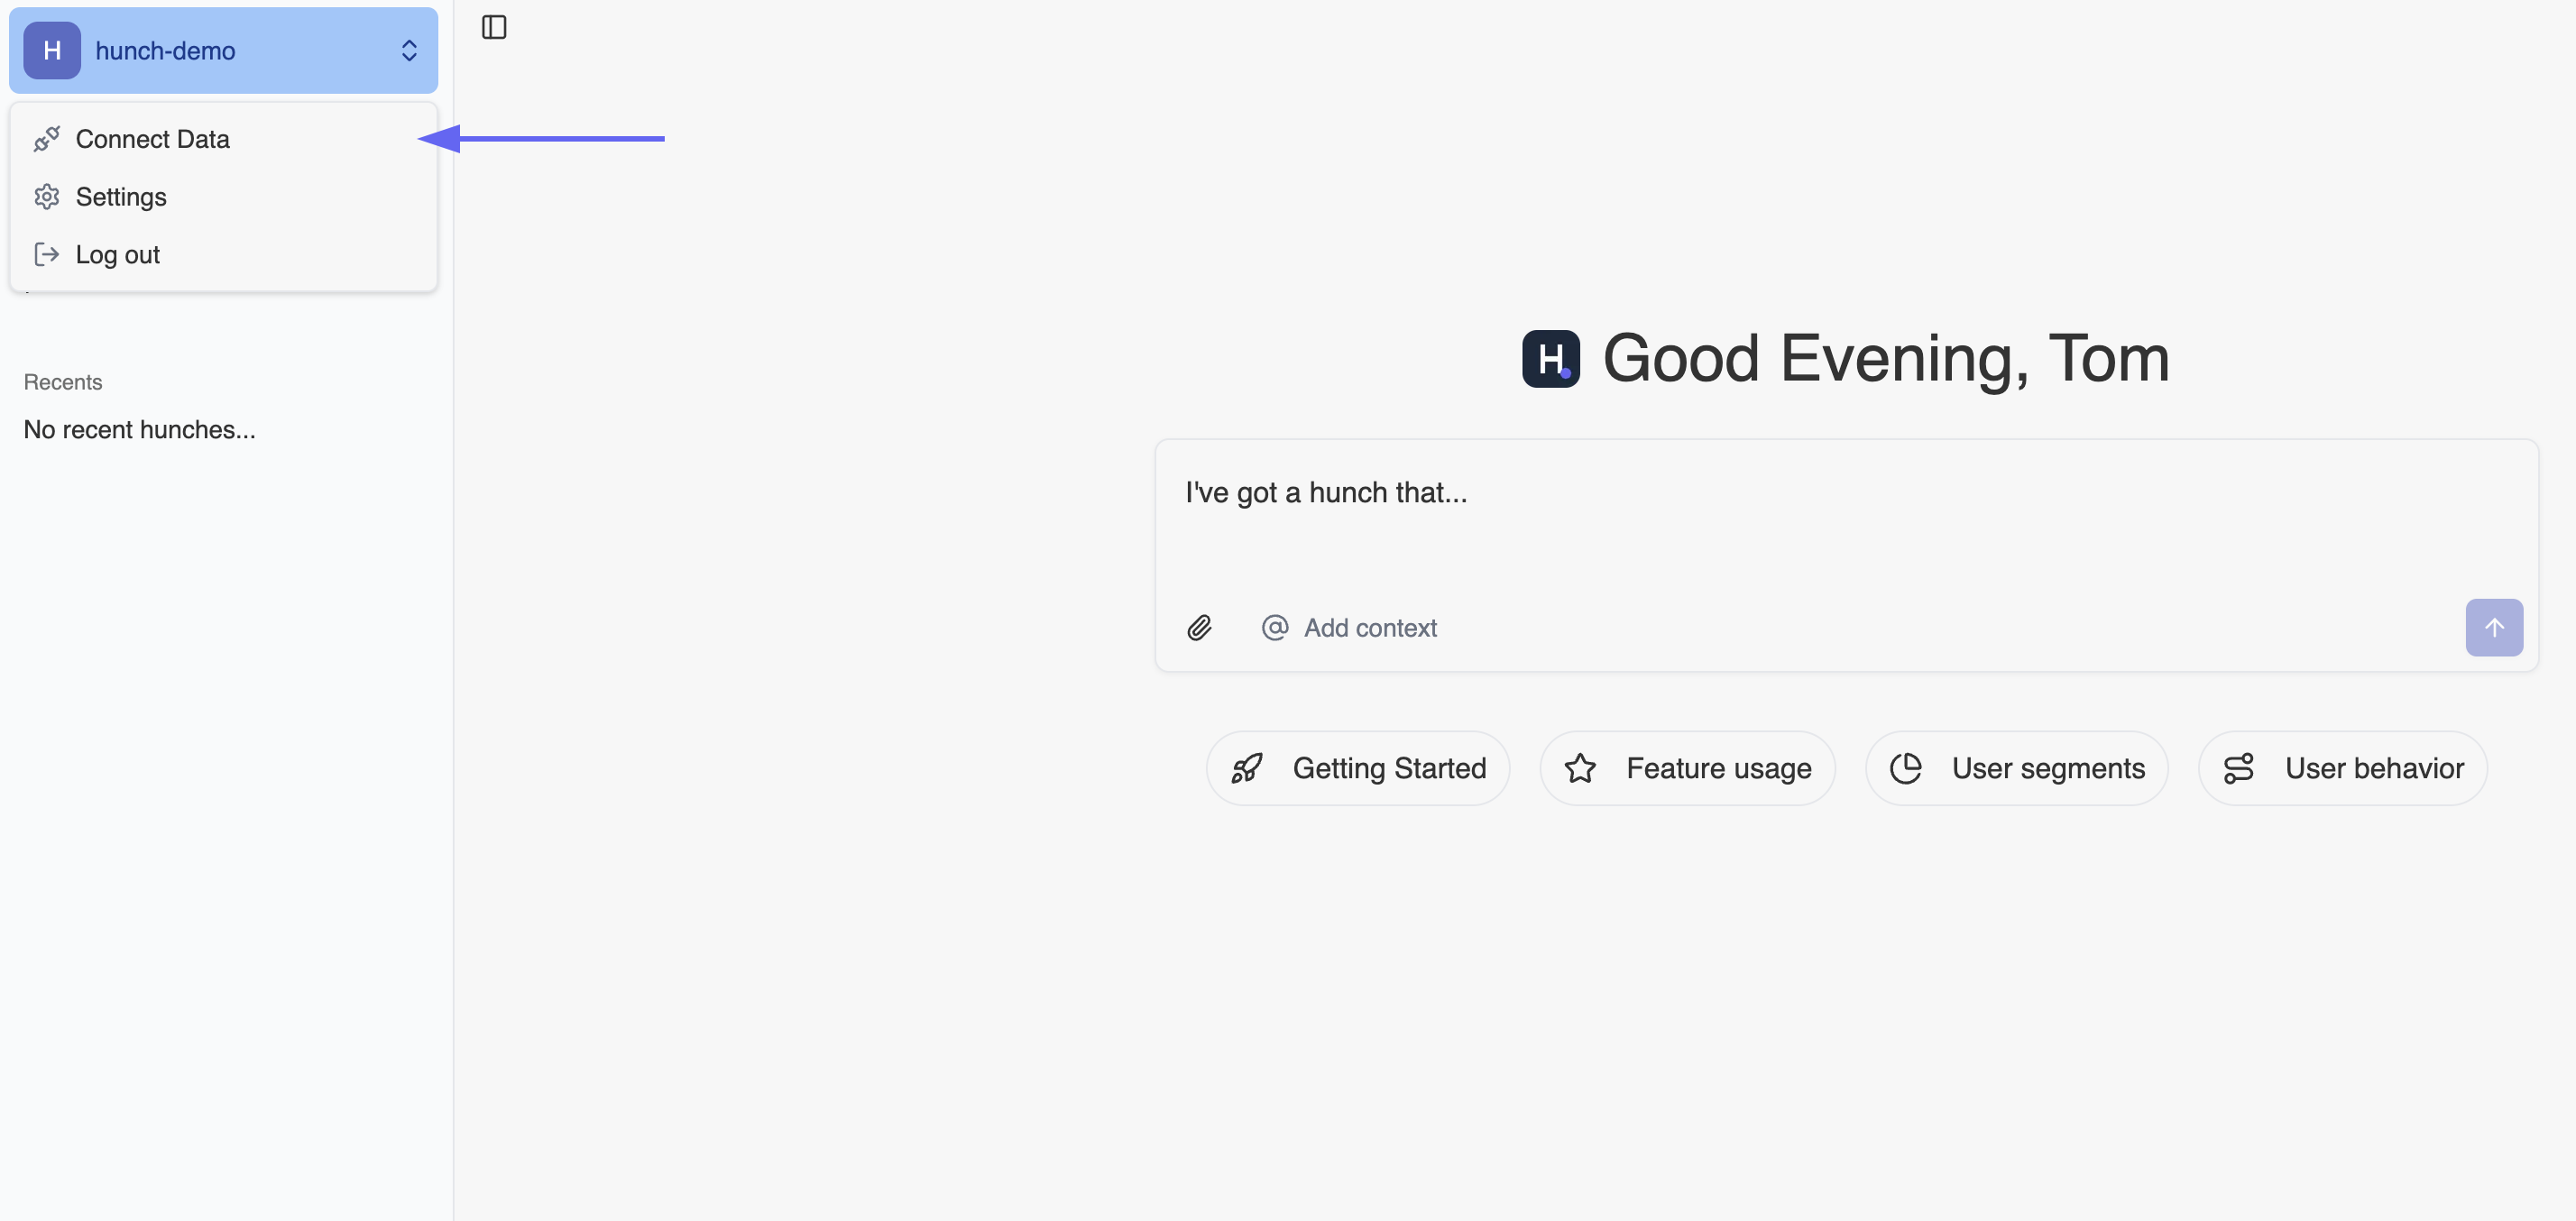 3. Click **Configure** on the MySQL row
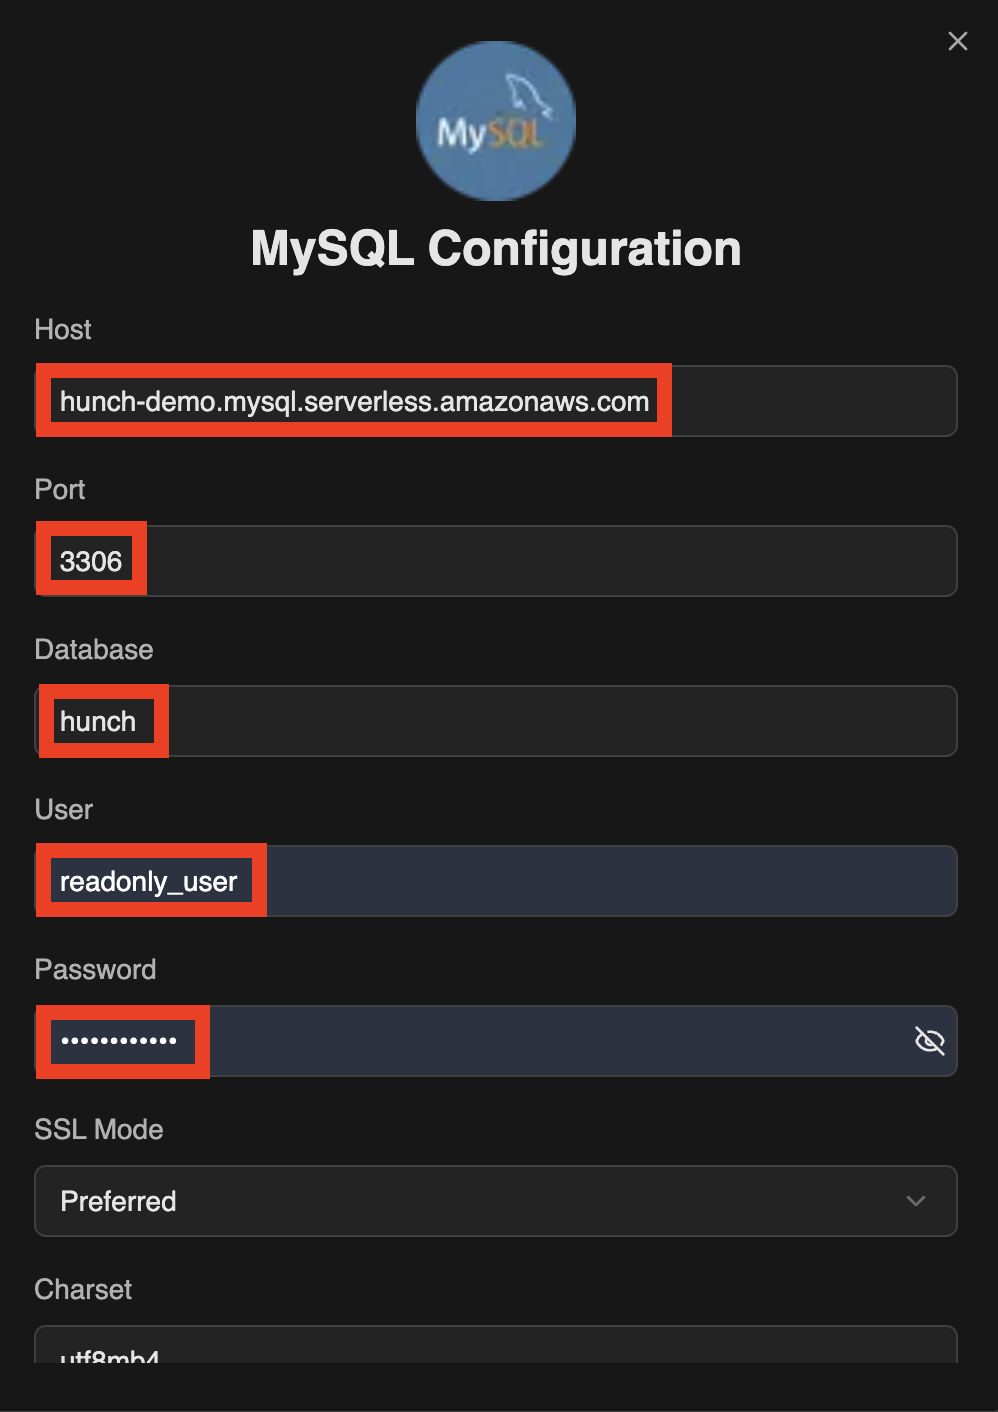
 4. Fill in the connection details:
* **Host**: Your MySQL server hostname or IP address
* **Port**: Your MySQL port (default: 3306)
* **Database**: The name of your database
* **User**: The read-only username you created (e.g., `hunch_readonly`)
* **Password**: The password for the read-only user
* **SSL Mode**: Select the appropriate SSL mode for your environment
4. Fill in the connection details:
* **Host**: Your MySQL server hostname or IP address
* **Port**: Your MySQL port (default: 3306)
* **Database**: The name of your database
* **User**: The read-only username you created (e.g., `hunch_readonly`)
* **Password**: The password for the read-only user
* **SSL Mode**: Select the appropriate SSL mode for your environment
 5. Click **Submit**
***
## 🎉 Done! You're now connected
Need help? Ping us at [support@hunch.dev](mailto:support@hunch.dev)
***
## 🔒 Security Best Practices
> **Important**: Hunch only requires read access to your MySQL data. We recommend:
>
> * Always use a dedicated read-only user (never use admin credentials)
> * Enable SSL encryption for production databases
> * Use strong passwords for database users
> * Limit network access to your MySQL server
***
## 🚨 Troubleshooting
### Common Connection Issues
1. **Connection Refused**: Check that MySQL is running and accessible from Hunch's servers
2. **Authentication Failed**: Verify the username and password are correct
3. **SSL Connection Error**: Ensure your SSL configuration matches the selected SSL mode
4. **Permission Denied**: Verify the user has the necessary permissions on the database
5. **Host Access Denied**: Check that the user is created with the correct host pattern (`%` for any host)
### MySQL-Specific Issues
1. **User Host Issues**: If connection fails, try creating the user with a specific host:
```sql theme={null}
CREATE USER 'hunch_readonly'@'your_hunch_ip' IDENTIFIED BY 'password';
```
2. **Firewall/Security Groups**: Ensure port 3306 (or your custom port) is accessible from Hunch's servers
3. **Character Set Issues**: Ensure your database uses UTF-8 encoding for proper data handling
5. Click **Submit**
***
## 🎉 Done! You're now connected
Need help? Ping us at [support@hunch.dev](mailto:support@hunch.dev)
***
## 🔒 Security Best Practices
> **Important**: Hunch only requires read access to your MySQL data. We recommend:
>
> * Always use a dedicated read-only user (never use admin credentials)
> * Enable SSL encryption for production databases
> * Use strong passwords for database users
> * Limit network access to your MySQL server
***
## 🚨 Troubleshooting
### Common Connection Issues
1. **Connection Refused**: Check that MySQL is running and accessible from Hunch's servers
2. **Authentication Failed**: Verify the username and password are correct
3. **SSL Connection Error**: Ensure your SSL configuration matches the selected SSL mode
4. **Permission Denied**: Verify the user has the necessary permissions on the database
5. **Host Access Denied**: Check that the user is created with the correct host pattern (`%` for any host)
### MySQL-Specific Issues
1. **User Host Issues**: If connection fails, try creating the user with a specific host:
```sql theme={null}
CREATE USER 'hunch_readonly'@'your_hunch_ip' IDENTIFIED BY 'password';
```
2. **Firewall/Security Groups**: Ensure port 3306 (or your custom port) is accessible from Hunch's servers
3. **Character Set Issues**: Ensure your database uses UTF-8 encoding for proper data handling