> ## Documentation Index
> Fetch the complete documentation index at: https://docs.hunch.dev/llms.txt
> Use this file to discover all available pages before exploring further.
# Snowflake
> Connect your Snowflake account to Hunch
This guide will help you securely connect your Snowflake account to Hunch in just a few minutes.
***
## ✅ Prerequisites
Before you begin, you'll need:
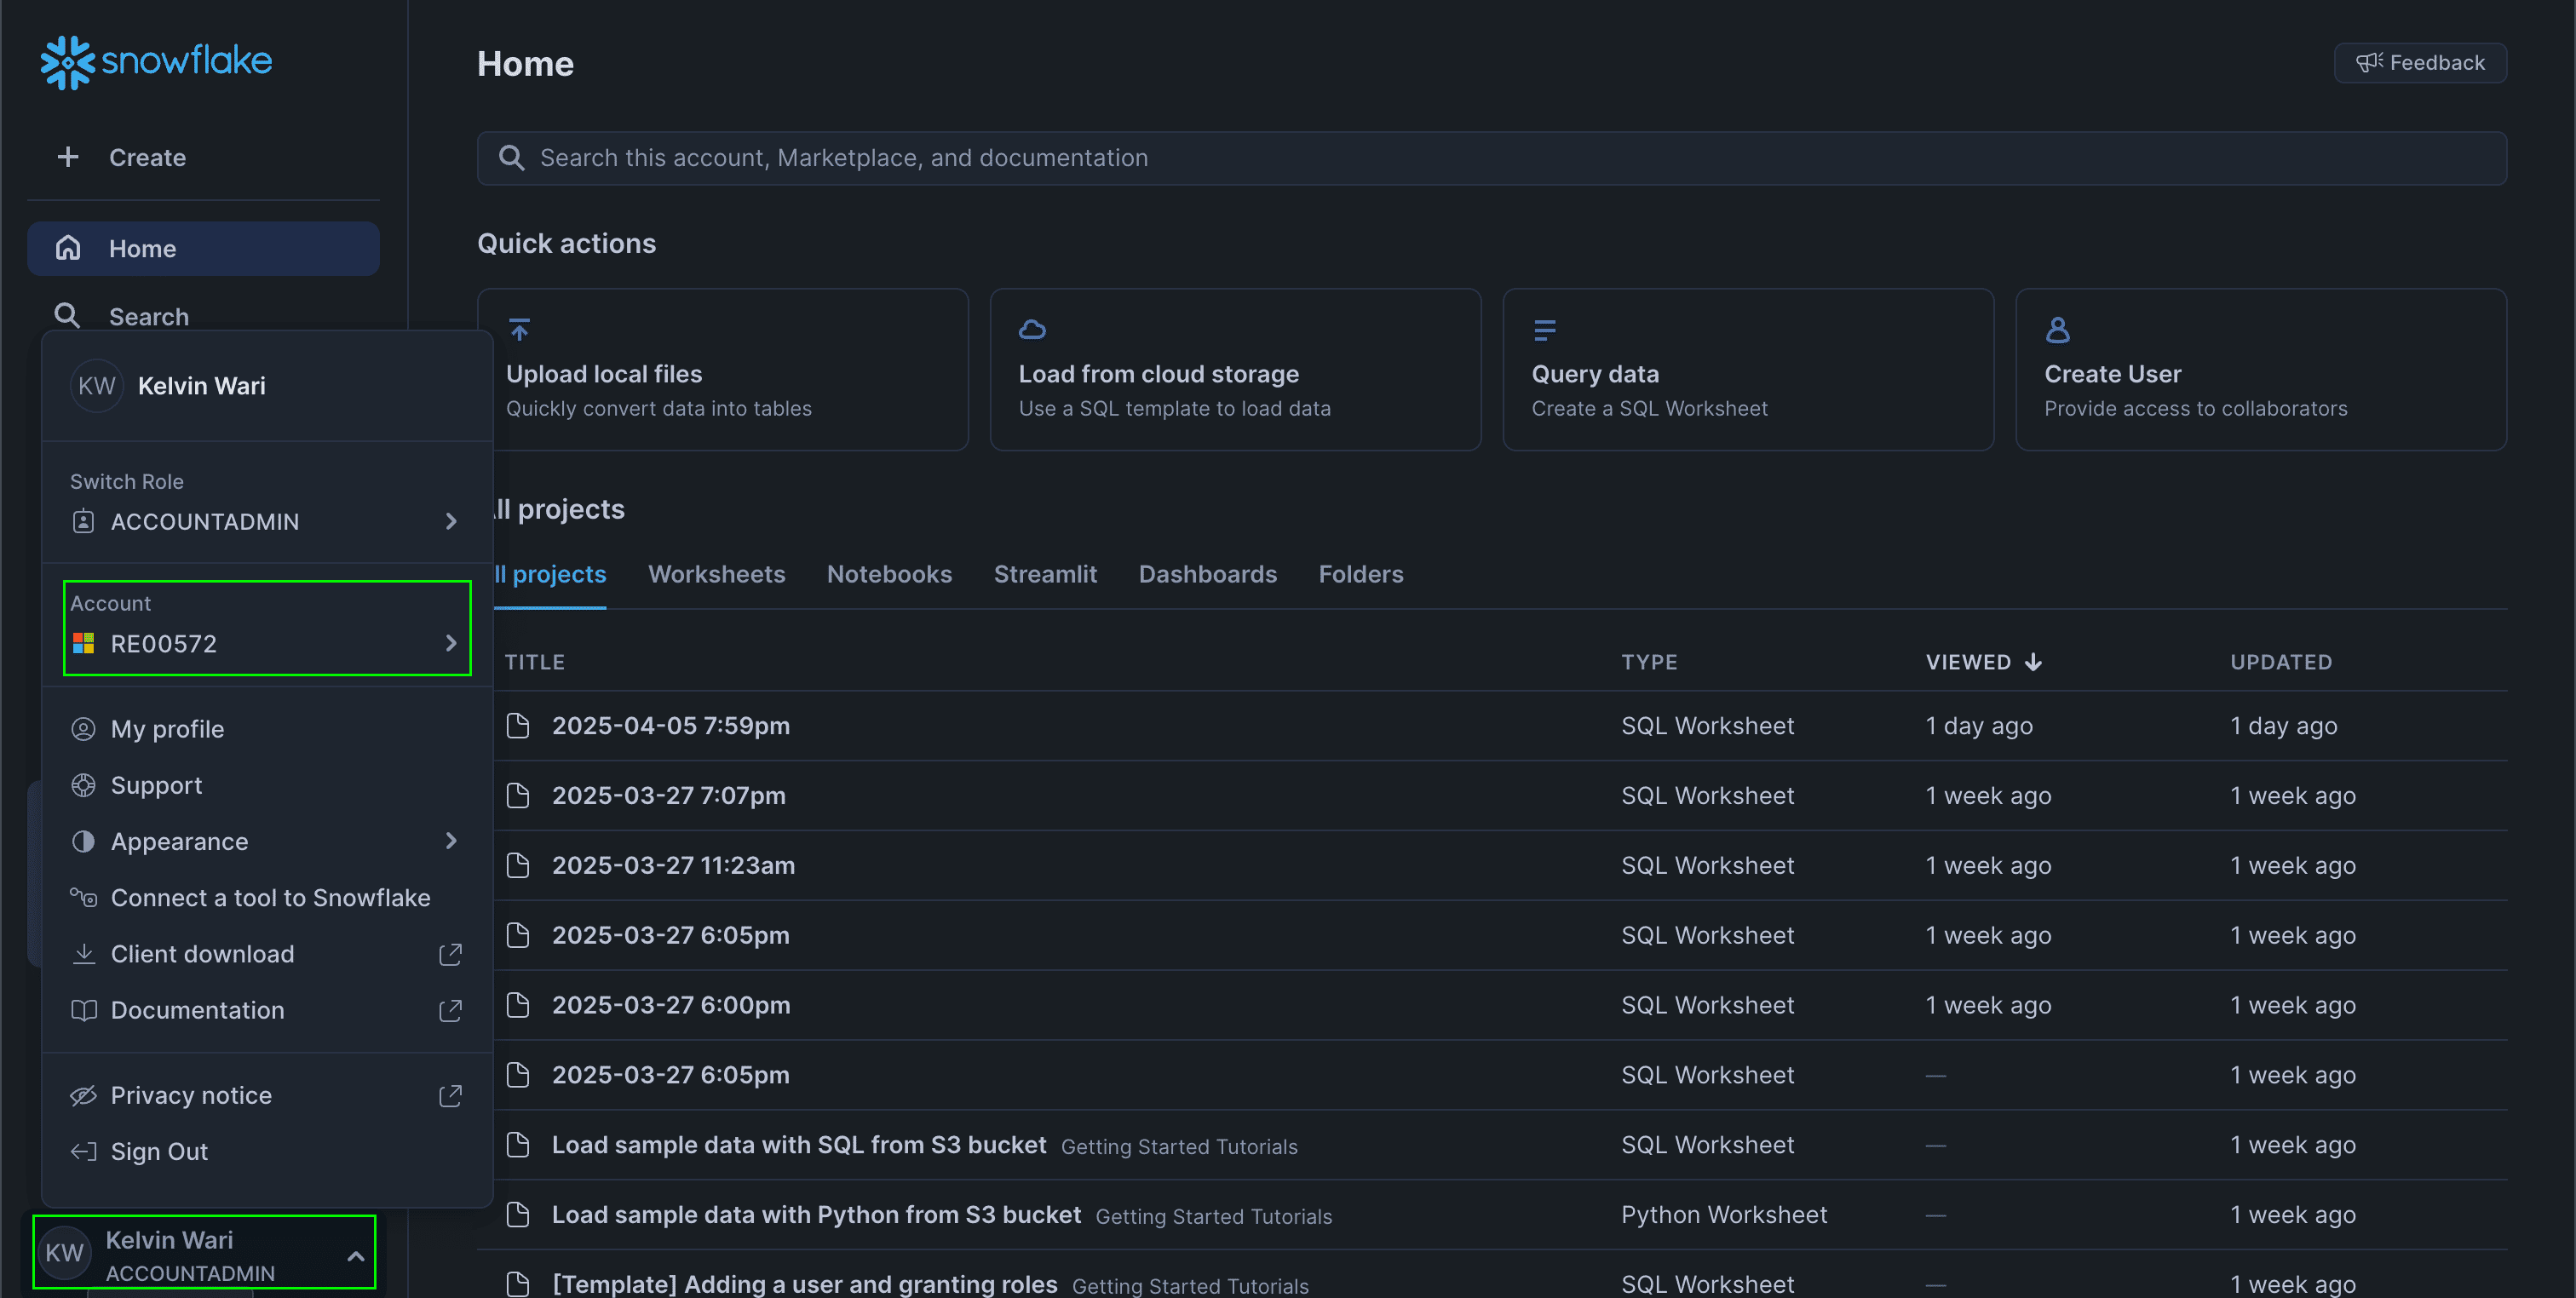
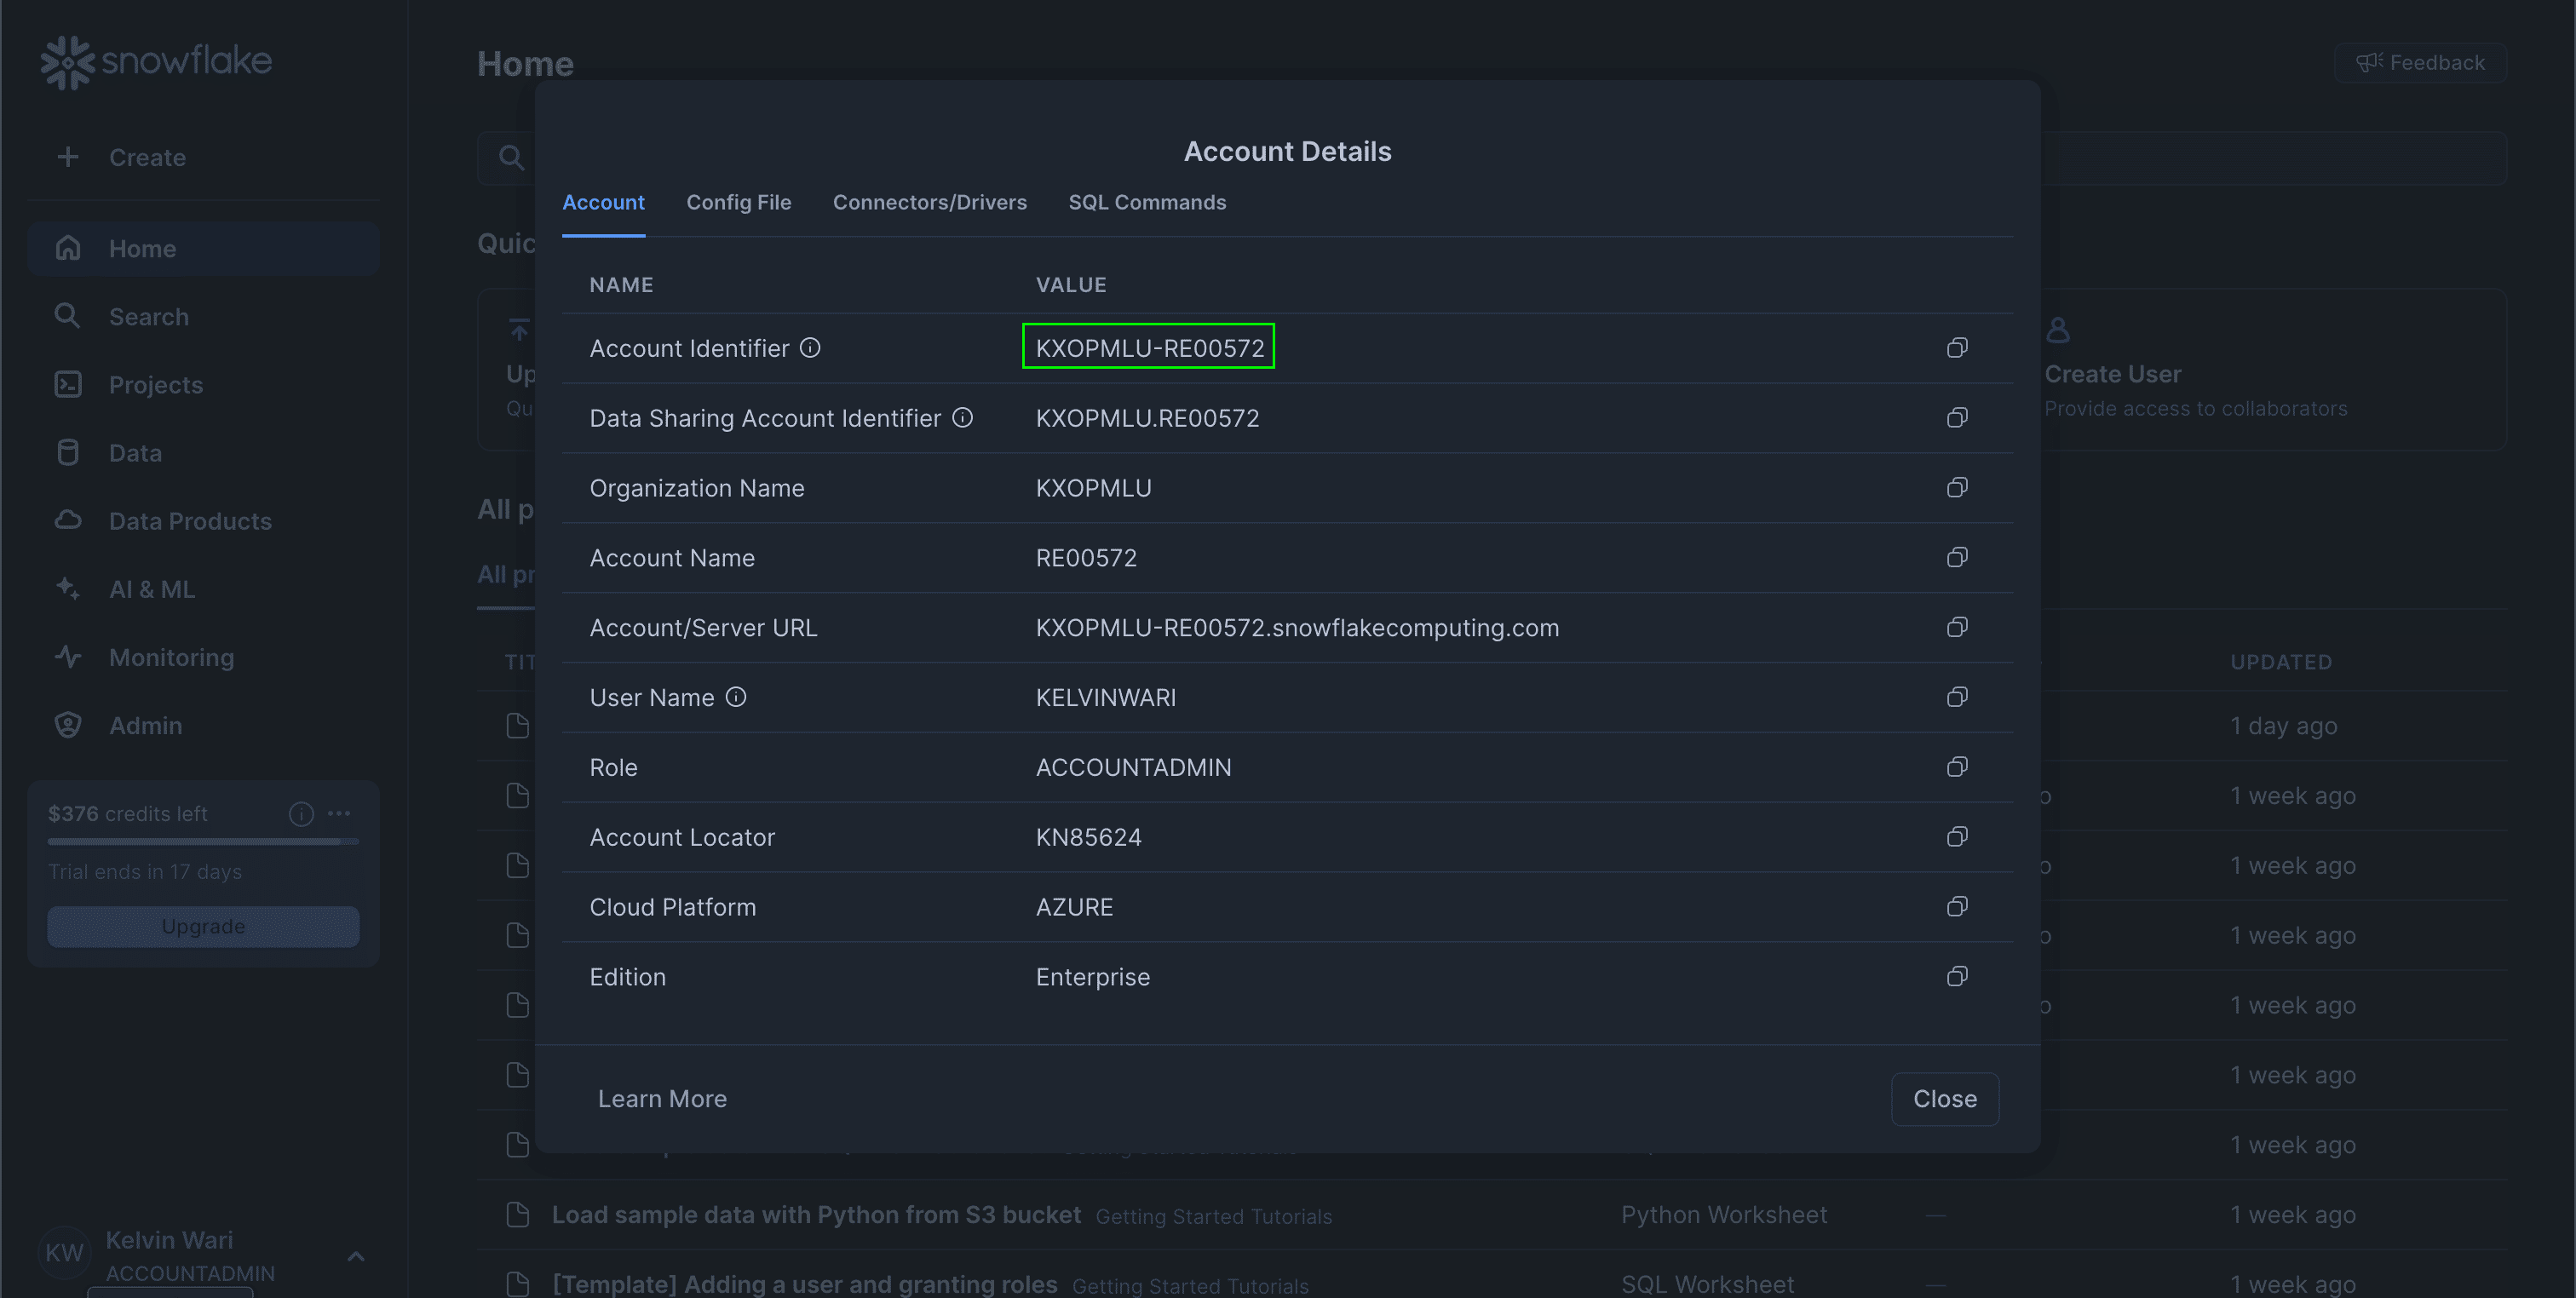
1. **Snowflake Account Identifier**
You can find this in your account settings:
 2. **Snowflake Username**
You can use your existing user or create a dedicated service user for Hunch.
### Optional: Create a Dedicated Service User
If you prefer to use a dedicated service user, run this SQL in your Snowflake UI:
```sql theme={null}
CREATE USER hunch_service_user
DEFAULT_ROLE = HUNCH_ANALYST
DEFAULT_WAREHOUSE = COMPUTE_WH
TYPE = SERVICE;
```
***
## 🛡️ Step 1: Set Up Role and Permissions
First, we need to set up the necessary permissions for Hunch to access your data. Run the following SQL in your Snowflake UI:
```sql theme={null}
CREATE ROLE IF NOT EXISTS HUNCH_ANALYST;
GRANT SELECT ON ALL TABLES IN SCHEMA . TO ROLE HUNCH_ANALYST;
GRANT USAGE ON DATABASE TO ROLE HUNCH_ANALYST;
GRANT USAGE ON SCHEMA . TO ROLE HUNCH_ANALYST;
GRANT USAGE ON WAREHOUSE TO ROLE HUNCH_ANALYST;
GRANT ROLE HUNCH_ANALYST TO USER ;
```
Replace the following placeholders with your actual values:
* ``: Your database name
* ``: Your schema name
* ``: Your warehouse name
* ``: Your username or service user name
***
## 🔐 Step 2: Generate a Authentication Keys
To establish a secure connection, you'll need to generate a key pair. Open your terminal and run:
```bash theme={null}
openssl genrsa 2048 | openssl pkcs8 -topk8 -inform PEM -out private_key.pem -nocrypt
openssl rsa -in private_key.pem -pubout -out public_key.pem
cat public_key.pem
```
* This will generate two files:
* `private_key.pem` → **Keep this secure! You'll need to upload this to Hunch.**
* `public_key.pem` → Copy the entire output as a single line.
***
## 🔁 Step 3: Attach the Public Key to the Snowflake User
Attach the public key to your Snowflake user by running this SQL command:
```sql theme={null}
ALTER USER
SET RSA_PUBLIC_KEY='';
```
Replace `` with your public key
***
## 🧩 Step 5: Fill the Hunch Integration Form
1. Log into [Hunch.dev](https://app.hunch.dev/login)
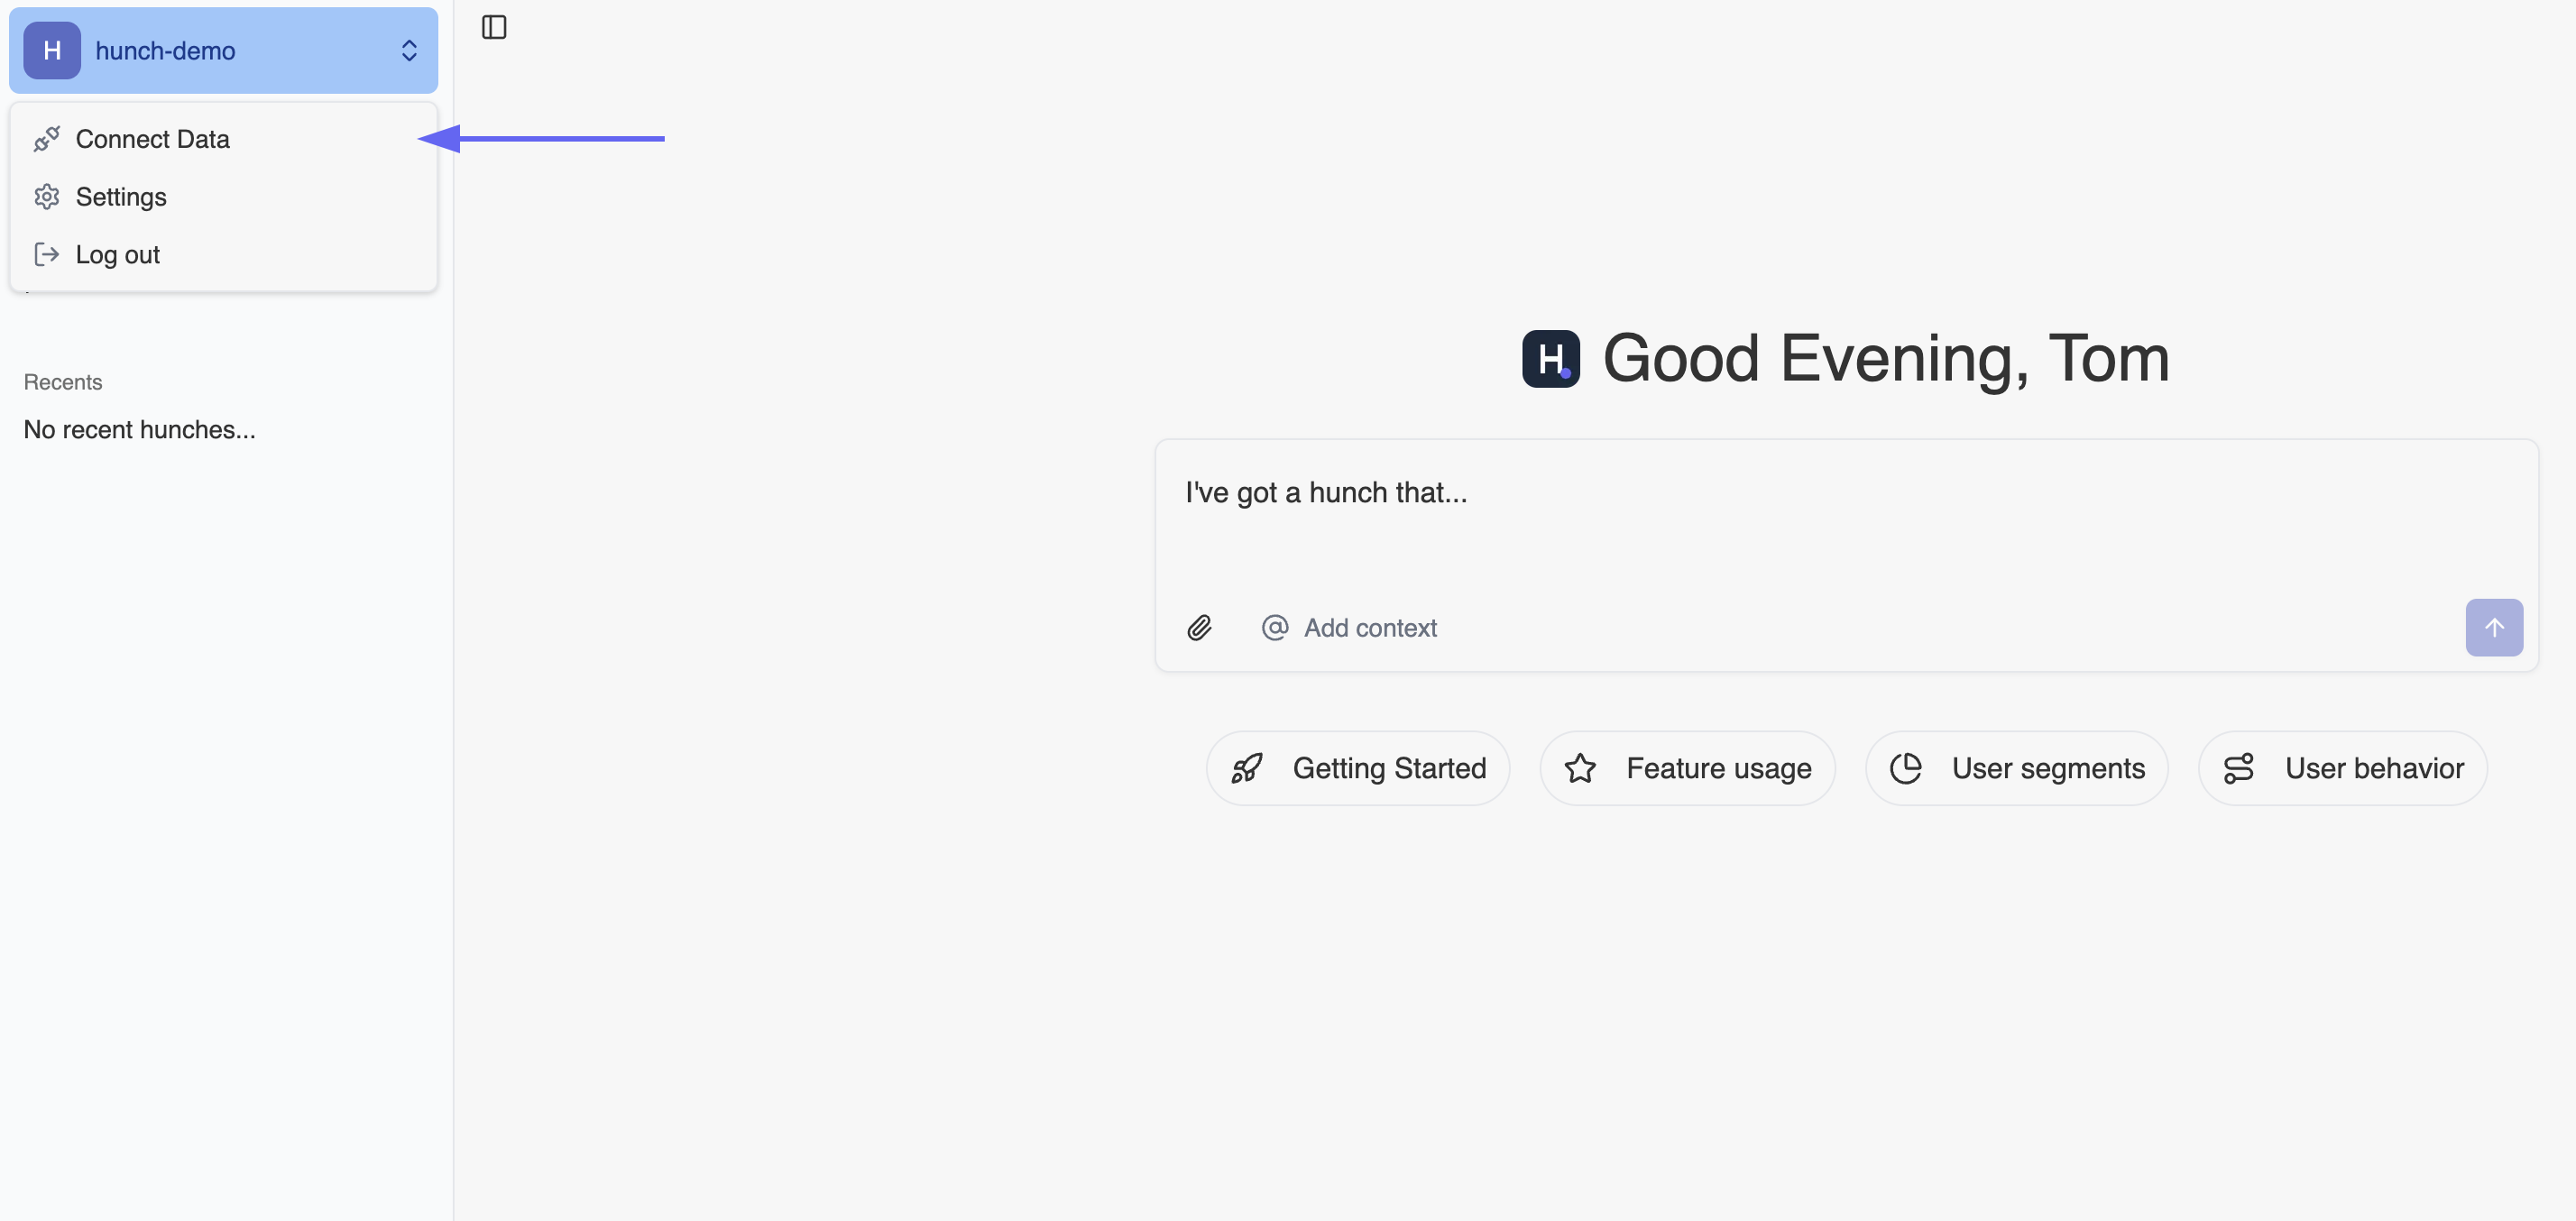
2. Click on your organization name > **Connect Data**
2. **Snowflake Username**
You can use your existing user or create a dedicated service user for Hunch.
### Optional: Create a Dedicated Service User
If you prefer to use a dedicated service user, run this SQL in your Snowflake UI:
```sql theme={null}
CREATE USER hunch_service_user
DEFAULT_ROLE = HUNCH_ANALYST
DEFAULT_WAREHOUSE = COMPUTE_WH
TYPE = SERVICE;
```
***
## 🛡️ Step 1: Set Up Role and Permissions
First, we need to set up the necessary permissions for Hunch to access your data. Run the following SQL in your Snowflake UI:
```sql theme={null}
CREATE ROLE IF NOT EXISTS HUNCH_ANALYST;
GRANT SELECT ON ALL TABLES IN SCHEMA . TO ROLE HUNCH_ANALYST;
GRANT USAGE ON DATABASE TO ROLE HUNCH_ANALYST;
GRANT USAGE ON SCHEMA . TO ROLE HUNCH_ANALYST;
GRANT USAGE ON WAREHOUSE TO ROLE HUNCH_ANALYST;
GRANT ROLE HUNCH_ANALYST TO USER ;
```
Replace the following placeholders with your actual values:
* ``: Your database name
* ``: Your schema name
* ``: Your warehouse name
* ``: Your username or service user name
***
## 🔐 Step 2: Generate a Authentication Keys
To establish a secure connection, you'll need to generate a key pair. Open your terminal and run:
```bash theme={null}
openssl genrsa 2048 | openssl pkcs8 -topk8 -inform PEM -out private_key.pem -nocrypt
openssl rsa -in private_key.pem -pubout -out public_key.pem
cat public_key.pem
```
* This will generate two files:
* `private_key.pem` → **Keep this secure! You'll need to upload this to Hunch.**
* `public_key.pem` → Copy the entire output as a single line.
***
## 🔁 Step 3: Attach the Public Key to the Snowflake User
Attach the public key to your Snowflake user by running this SQL command:
```sql theme={null}
ALTER USER
SET RSA_PUBLIC_KEY='';
```
Replace `` with your public key
***
## 🧩 Step 5: Fill the Hunch Integration Form
1. Log into [Hunch.dev](https://app.hunch.dev/login)
2. Click on your organization name > **Connect Data**
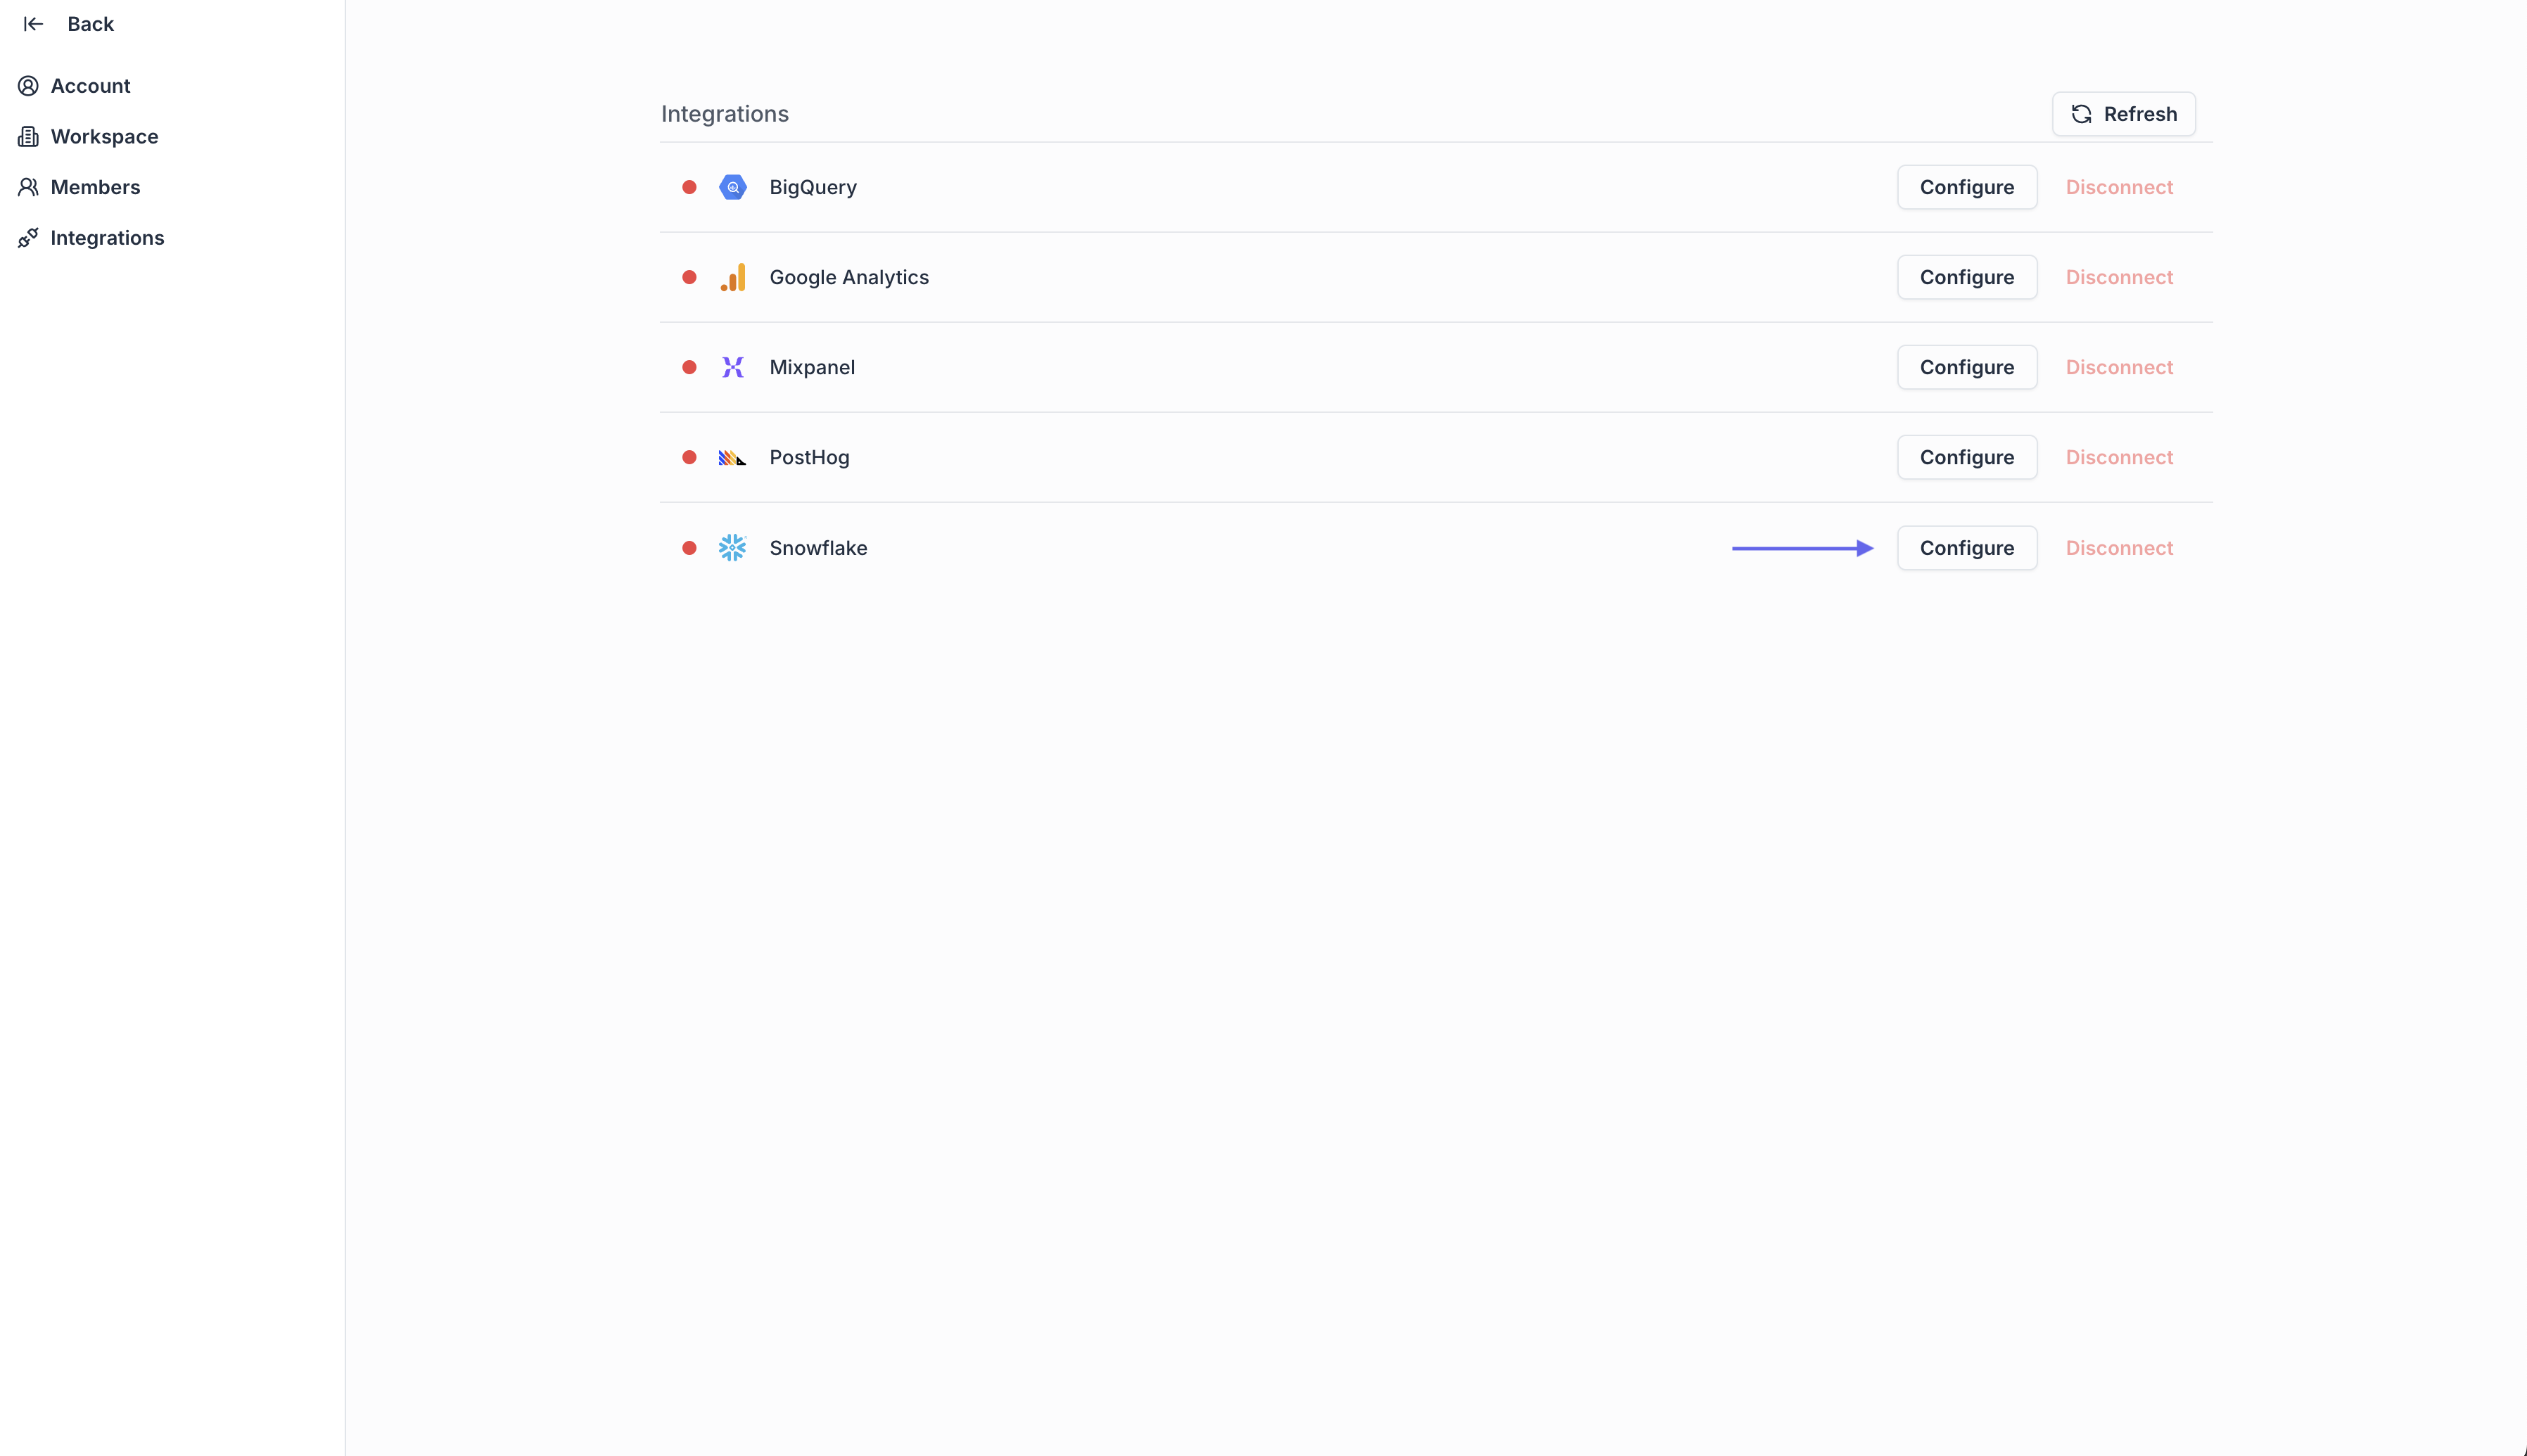
 3. Click **Configure** on the Snowflake row
{" "}
3. Click **Configure** on the Snowflake row
{" "}
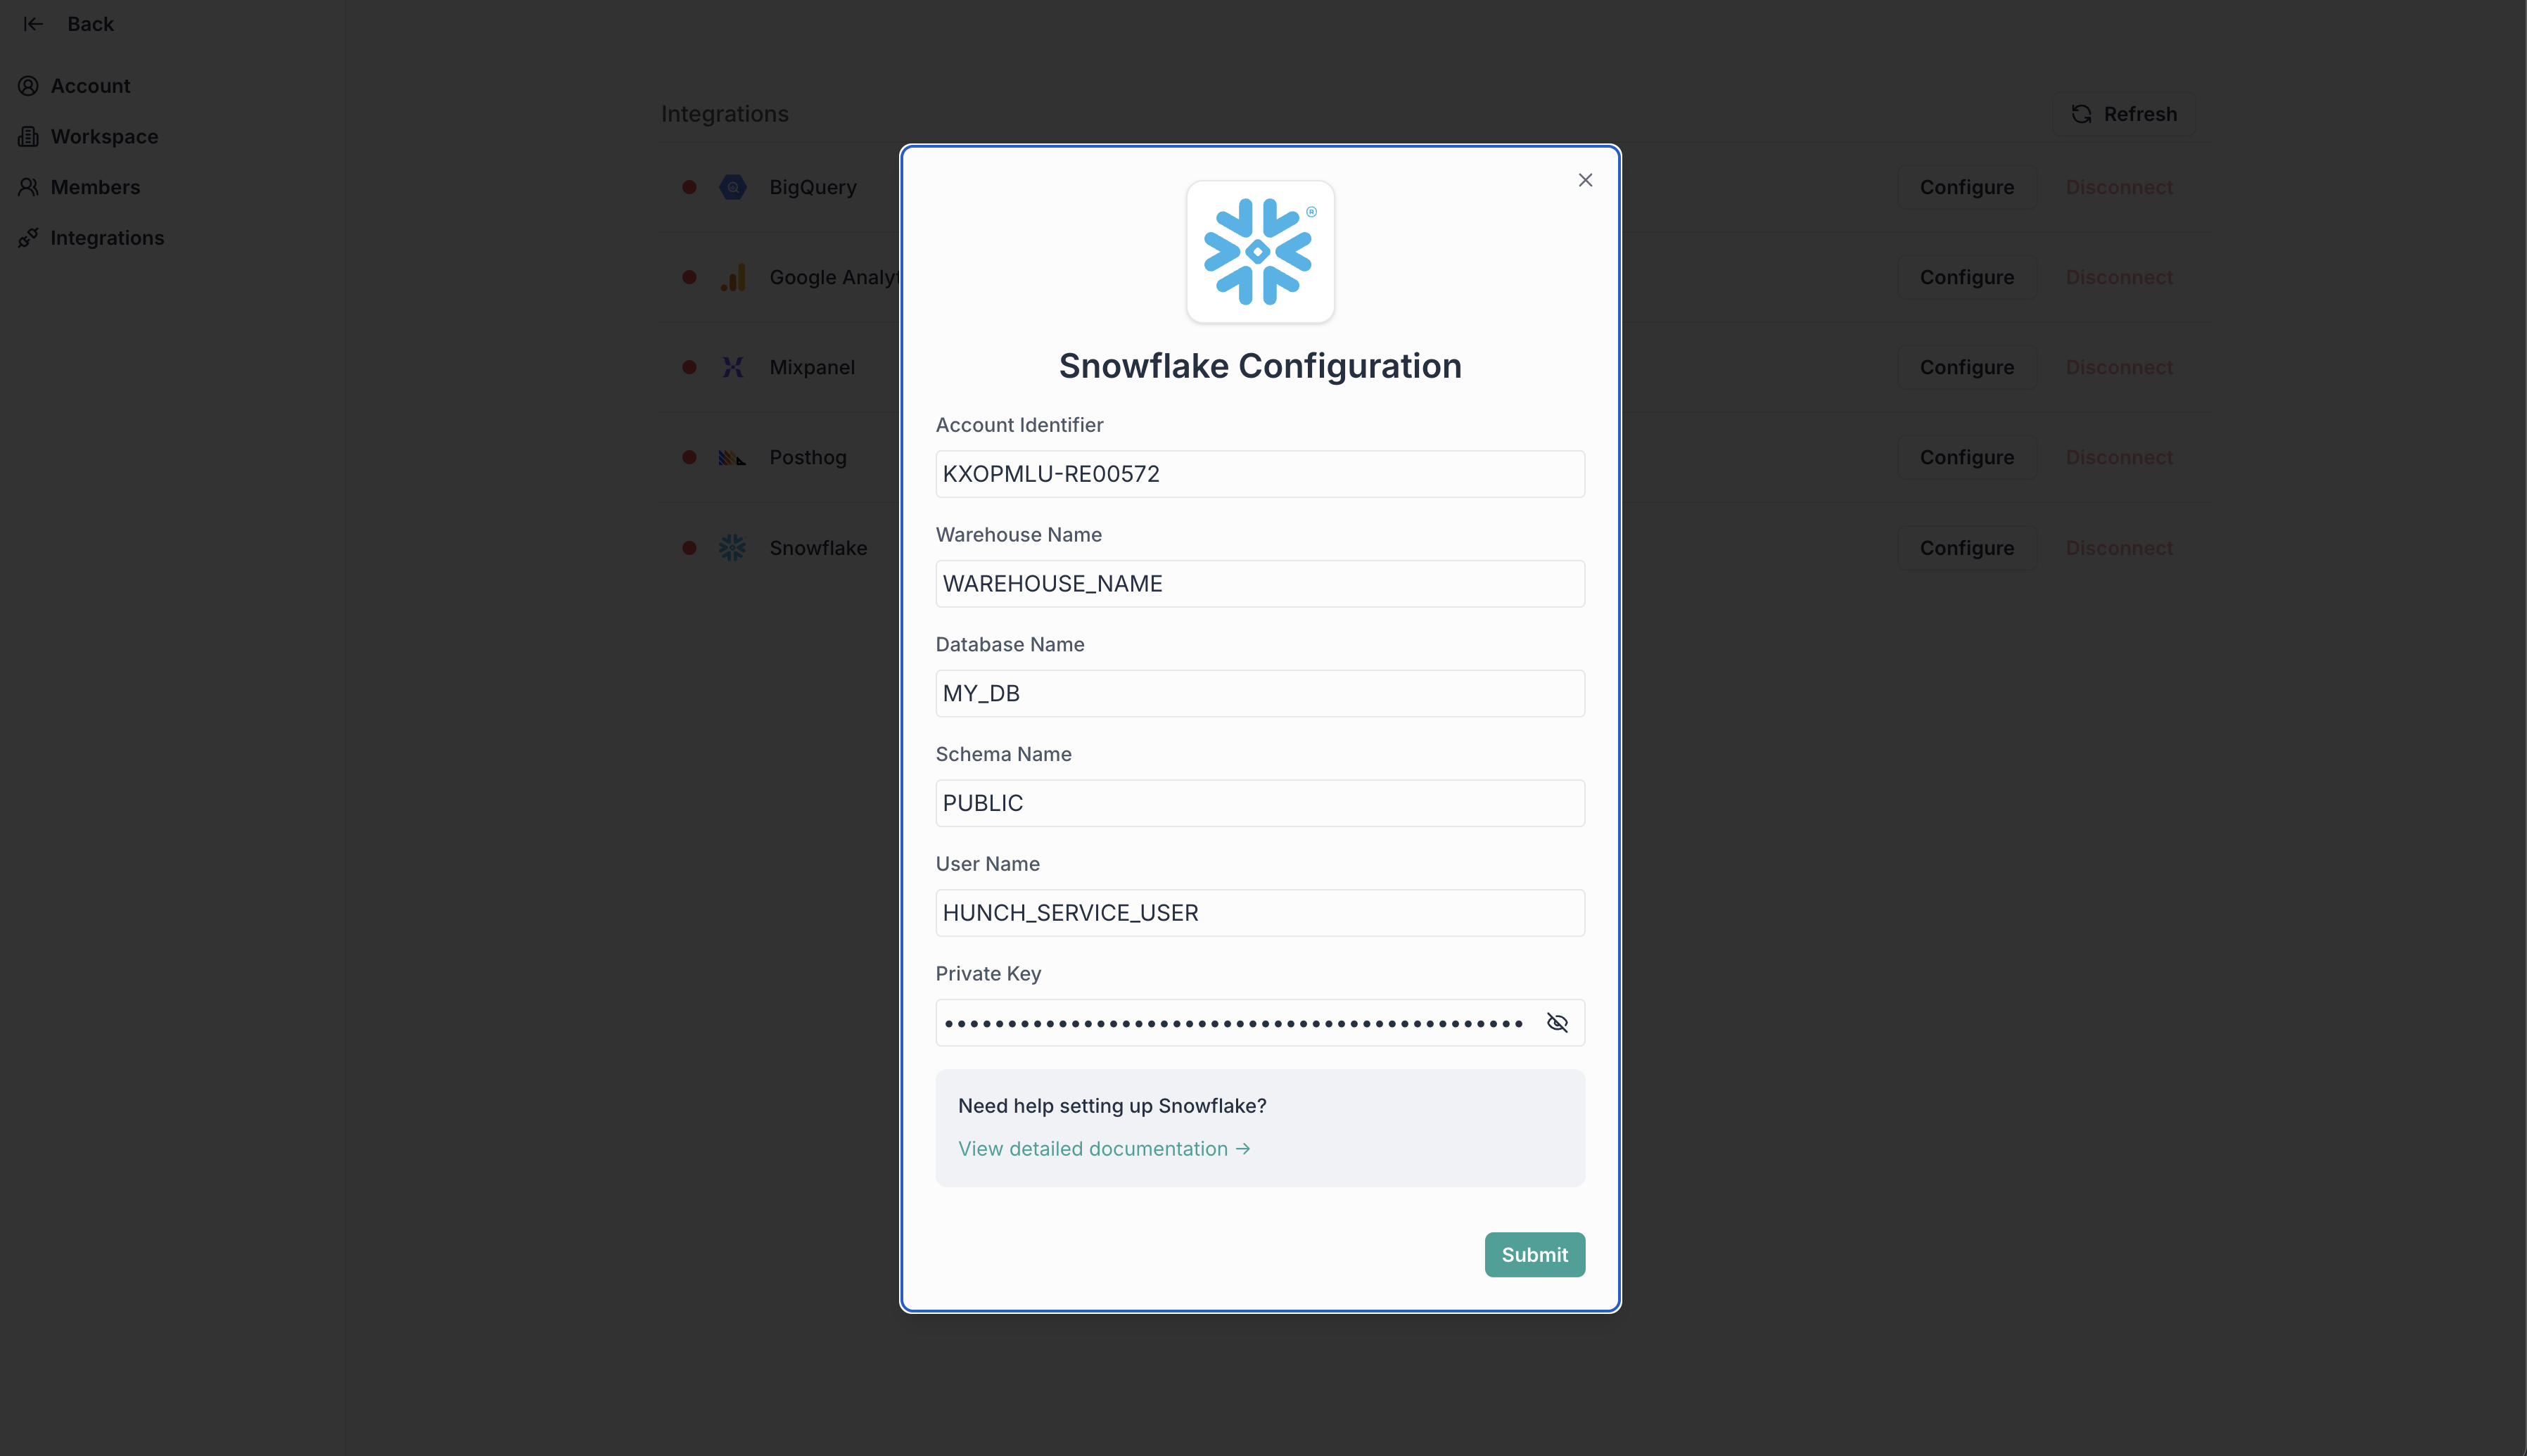
 In the Hunch integration form, enter the following details:
* **Description**\
A name for this connection (e.g., "My Snowflake").
* **Account Identifier**\
Your Snowflake account identifier (e.g., `KXOPMLU-RE00572`).
* **Warehouse Name**\
The name of your Snowflake warehouse (e.g., `WAREHOUSE_NAME`).
* **Database Name**\
The name of your Snowflake database (e.g., `MY_DB`).
* **Schema Name**\
The schema you want to use (e.g., `PUBLIC`).
* **User Name**\
The username or service user you created (e.g., `HUNCH_SERVICE_USER`).
* **Private Key**\
Paste the contents of your `private_key.pem` file (from Step 2).
* Click **Submit**
{" "}
In the Hunch integration form, enter the following details:
* **Description**\
A name for this connection (e.g., "My Snowflake").
* **Account Identifier**\
Your Snowflake account identifier (e.g., `KXOPMLU-RE00572`).
* **Warehouse Name**\
The name of your Snowflake warehouse (e.g., `WAREHOUSE_NAME`).
* **Database Name**\
The name of your Snowflake database (e.g., `MY_DB`).
* **Schema Name**\
The schema you want to use (e.g., `PUBLIC`).
* **User Name**\
The username or service user you created (e.g., `HUNCH_SERVICE_USER`).
* **Private Key**\
Paste the contents of your `private_key.pem` file (from Step 2).
* Click **Submit**
{" "}
 ***
### 🎉 Done! You're now connected
Need help? Ping us at [support@hunch.dev](mailto:support@hunch.dev)
***
## 🔒 A note on security
> **Note**: Hunch uses JWT (JSON Web Token) authentication with RSA key pair, following Snowflake's recommended security practices for third-party integrations. This method ensures no passwords are stored and provides strong cryptographic security for the connection.
***
### 🎉 Done! You're now connected
Need help? Ping us at [support@hunch.dev](mailto:support@hunch.dev)
***
## 🔒 A note on security
> **Note**: Hunch uses JWT (JSON Web Token) authentication with RSA key pair, following Snowflake's recommended security practices for third-party integrations. This method ensures no passwords are stored and provides strong cryptographic security for the connection.